

12:35 PM How to make money with Google AdMob ads in Ionic framework 3 |
Originally posted on my blog.
IntroductionThere are multiple ways you can earn money with your app these days and here are just a few of them:
In this post, I'm going to cover the Ad-based monetization option, and I'll show you how to add Google AdMob ads to a simple Ionic 3 blank template application. There are two parts to implementing Google AdMob ads to an Ionic project and I broke them into: AdMob settings and Ionic settings. Demo app and repoYou can check the final code on Github. When you clone it, run You should see something like this in your simulator/emulator:
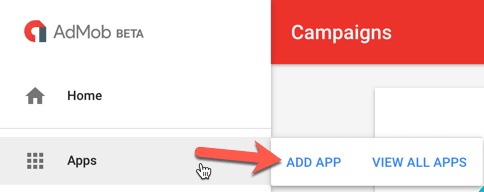
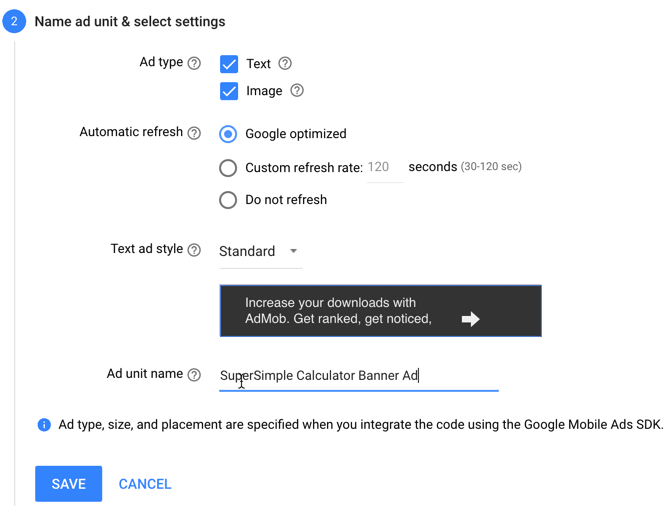
AdMob settingsLet's start with AdMob settings:
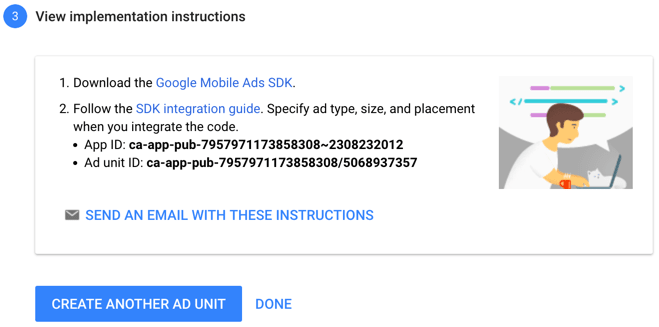
The most important thing to note here is this Ad unit ID, which in my test case is ca-app-pub-7957971173858308/5068937357. Make a note of this string as it's the most important part of this setting. You can click on the copy to clipboard button and paste it as a comment (for now) in your app.
Ionic settingsThose of you familiar with Ionic 1 know that you can add any plugin to your Ionic project thanks to the project called ngCordova. For Ionic 3, there's the same thing called Ionic Native. Ionic Native is a TypeScript wrapper for Cordova/PhoneGap plugins that makes it easy to add any native functionality that you may need into your Ionic app. Ionic Native wraps the plugin callbacks in a Promise or an Observable, providing a common interface for all plugins and ensuring that native events trigger change detection in Angular. First, let's start an empty Ionic 3 application based on the blank template:
You should see the following output: ✔ Creating directory ./Ionic3AdMobTest - done! [INFO] Fetching app base (https://github.com/ionic-team/ionic2-app-base/archive/master.tar.gz) ✔ Downloading - done! [INFO] Fetching starter template blank (https://github.com/ionic-team/ionic2-starter-blank/archive/master.tar.gz) ✔ Downloading - done! ✔ Updating package.json with app details - done! ✔ Creating configuration file ionic.config.json - done! [INFO] Installing dependencies may take several minutes! > npm install ✔ Running command - done! > npm install --save-dev --save-exact ionic@latest ✔ Running command - done! > npm install --save-dev --save-exact @ionic/cli-plugin-ionic-angular@latest ✔ Running command - done! > npm install --save-dev --save-exact @ionic/cli-plugin-cordova@latest ✔ Running command - done! > npm dedupe ✔ Running command - done! > git init ✔ Running command - done! > git add -A ✔ Running command - done! > git commit -m "Initial commit" --no-gpg-sign ✔ Running command - done! ♬ ♫ ♬ ♫ Your Ionic app is ready to go! ♬ ♫ ♬ ♫ Run your app in the browser (great for initial development): ionic serve Run on a device or simulator: ionic cordova run ios Test and share your app on a device with the Ionic View app: http://view.ionic.io Next Steps: Go to your newly created project: cd ./Ionic3AdMobTest Navigate to the root of the application with your Terminal/Command prompt and execute the following command to add the cordova-plugin-admobpro plugin:
You should see the following output after running the command: ✔ Running command - done! Adding cordova-plugin-admobpro to package.json Saved plugin info for "cordova-plugin-admobpro" to config.xml Additionally, you will also need to run this command:
which, if completed successfully, will only output something like You need to add this second command as well because this installs some files needed by TypeScript.
Btw, there is also a free version of the AdMob Pro plugin. But, honestly, if you really start making money with your app, this will be a minor expense. Besides, if you're having problems giving back to the actual plugin through which you're making money then my dear padawan you have yet much to learn... Now, let's add this plugin to our app's NgModule. In the
and then add it to the
import { BrowserModule } from '@angular/platform-browser';
import { ErrorHandler, NgModule } from '@angular/core';
import { IonicApp, IonicErrorHandler, IonicModule } from 'ionic-angular';
import { SplashScreen } from '@ionic-native/splash-screen';
import { StatusBar } from '@ionic-native/status-bar';

import { MyApp } from './app.component';
import { HomePage } from '../pages/home/home';

import { AdMobPro } from '@ionic-native/admob-pro';

@NgModule({
 declarations: [
 MyApp,
 HomePage
 ],
 imports: [
 BrowserModule,
 IonicModule.forRoot(MyApp)
 ],
 bootstrap: [IonicApp],
 entryComponents: [
 MyApp,
 HomePage
 ],
 providers: [
 StatusBar,
 SplashScreen,
 AdMobPro,
 { provide: ErrorHandler, useClass: IonicErrorHandler }
 ]
})
export class AppModule { }
Now I'm going to show you the final content of the
import { Component } from '@angular/core';
import { NavController } from 'ionic-angular';

import { AdMobPro } from '@ionic-native/admob-pro';
import { Platform } from 'ionic-angular';

@Component({
 selector: 'page-home',
 templateUrl: 'home.html'
})
export class HomePage {
 constructor(public navCtrl: NavController, platform: Platform, private admob: AdMobPro) {
 platform.ready().then(() => {
 var admobid = {
 banner: 'ca-app-pub-7957971173858308/5068937357',
 interstitial: 'ca-app-pub-7957971173858308/5667703151'
 };

 this.admob.createBanner({
 adId: admobid.banner,
 isTesting: true,
 autoShow: true,
 position: this.admob.AD_POSITION.BOTTOM_CENTER
 })

 this.admob.prepareInterstitial({
 adId: admobid.interstitial,
 isTesting: true,
 autoShow: false
 })
 });
 }

 showInterstitialAd() {
 if (AdMobPro) {
 this.admob.showInterstitial();
 }
 }
}
First, we added the imports:
import { AdMobPro } from '@ionic-native/admob-pro';
import { Platform } from 'ionic-angular';
Then, via the constructor we injected
Then we wrapped everything in the But then again, sometimes you would, and this is what it would make it a nightmare to debug. This is a very common issue that I've seen even back from Ionic 1 when answering the questions on StackOverflow. So, you may want to keep an |
|
|


| Total comments: 0 | |